Setting the Right Foundation
When you start tracking your finances, bringing over your existing accounts perfectly is critical. The Account Initiation Balance flow allows you to securely assign initial balances—both Positive (Assets) and Negative (Liabilities)—to ensure your dashboard immediately reflects your true net worth.
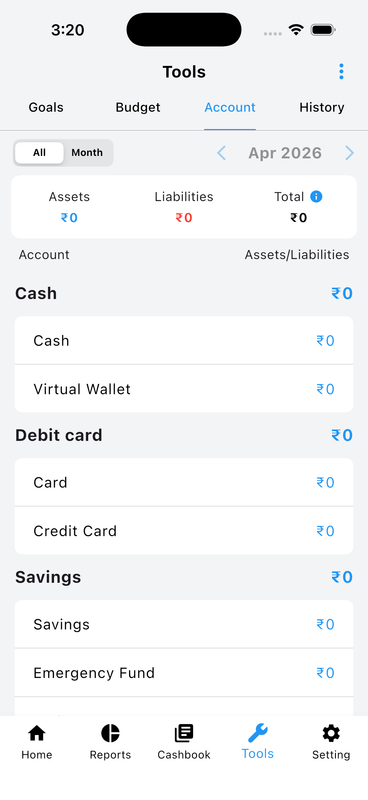
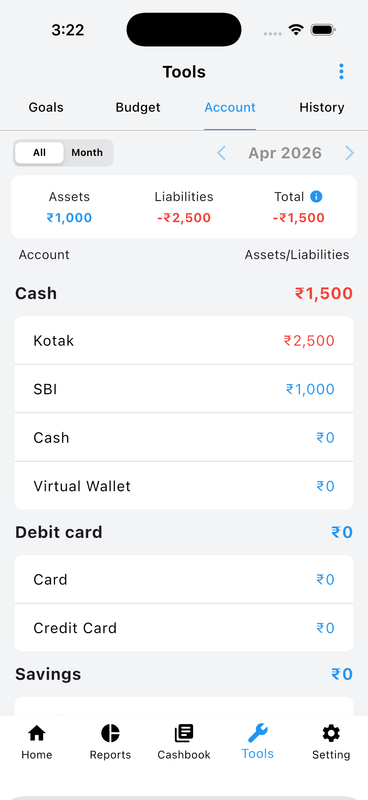
1. View Your Assets and Liabilities
Start from the Tools tab and tap the Account section to get an instant overview of your entire financial position. At the top, you will see three key figures:
📘 Assets (Blue) — Your positive balances. Amounts shown in blue represent money you own, such as cash, savings, or bank deposits.
📕 Liabilities (Red) — Your negative balances. Amounts shown in red represent money you owe, such as credit card dues or loans.
Until you add your starting accounts, all balances will show as zero. The initiation flow helps you set up each account with its correct real-world balance from day one.
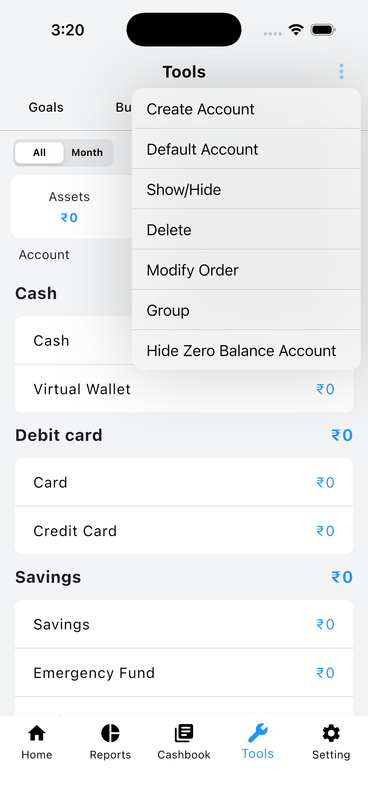
2. Account Management Options
Tap the menu icon (⋮) in the top-right corner to access all account management tools. From here you can:
➕ Create Account — Add a new account with a name, group, and opening balance.
⚙️ Default Settings — Configure global account preferences that apply across the app.
👁️ Show / Hide Accounts — Control which accounts appear in your transaction lists and reports without deleting them.
🗑️ Delete Account or Group — Permanently remove an account or an entire account group you no longer need.
🔀 Reorder Accounts — Drag and drop accounts to arrange them in your preferred display order.
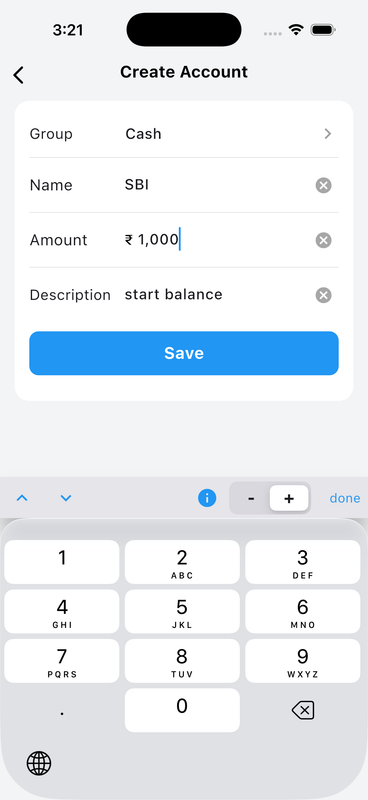
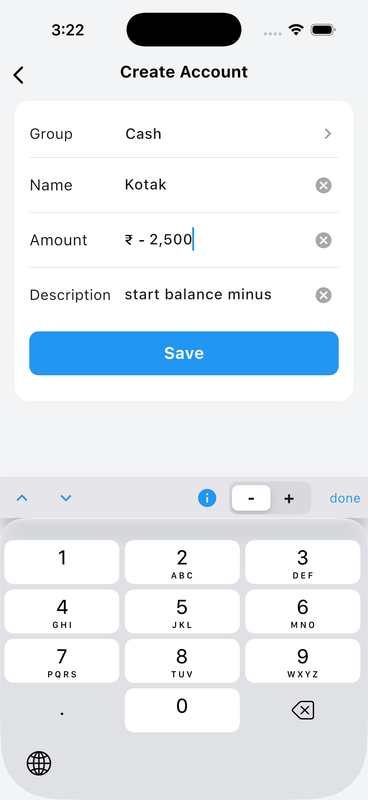
3. Create a New Account
Tap Create Account to open the account creation form. Fill in the following details:
🏦 Group — Choose the category for your account, such as Cash, Savings, Debit Card, or Credit Card.
✏️ Name — Enter a clear, recognizable name for the account (e.g., SBI Bank, Kotak Card).
💰 Amount — Use the numeric keypad to type your opening balance. At the top of the keypad, you will see two important buttons:
• Tap Plus (+) to set a positive balance — for accounts where you have money (Assets).
• Tap Minus (−) to set a negative balance — for accounts where you owe money, like a credit card (Liabilities).
📝 Description — Optionally add a note such as "Starting balance" for your own reference.
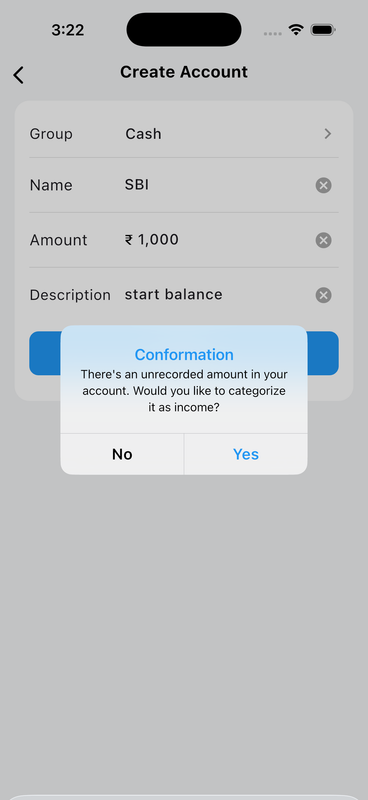
4. Confirm Initial Income or Expense
Upon saving a positive balance, the system will seamlessly ask if you would like to categorize this unrecorded opening amount as an Income transaction.
if select plus means account balance is Income and if select minus means account balance is expense
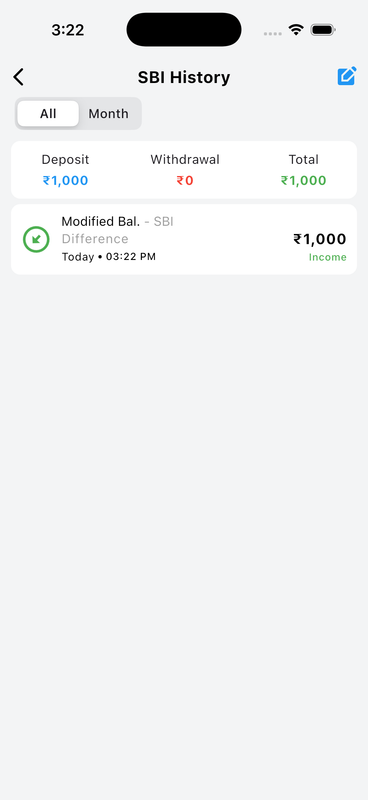
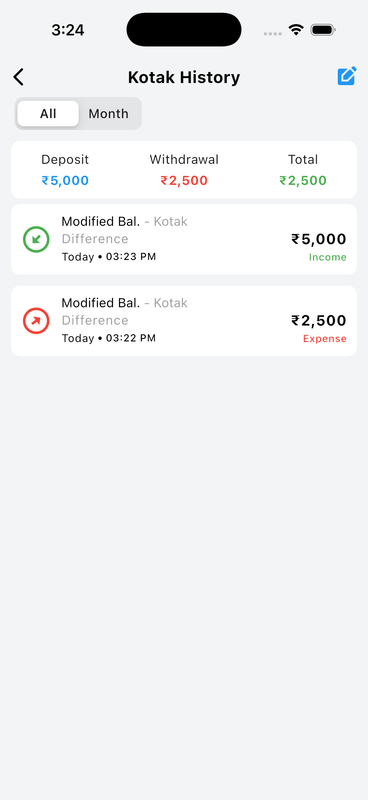
5. Positive History Log
Once confirmed, your positive initial balance safely records in the account history as a Modified Bal., properly categorized and instantly acting as Income.
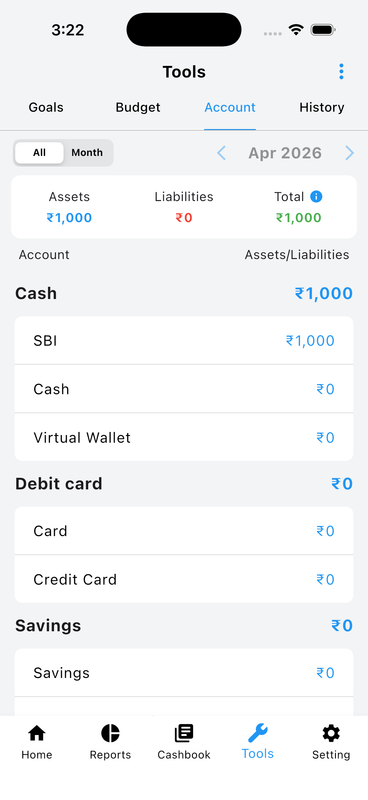
6. Updated Total Assets
Navigate back to the Tools view, and you will now see your newly created account proudly reflecting its value under your total Assets.
7. Negative (Liability) Account Setup
For credit cards or loans, setup is just as easy! Enter the group and name, and use the Minus (-) button on the keypad to log a negative current balance (e.g., ₹ -2,500) for your Liabilities.
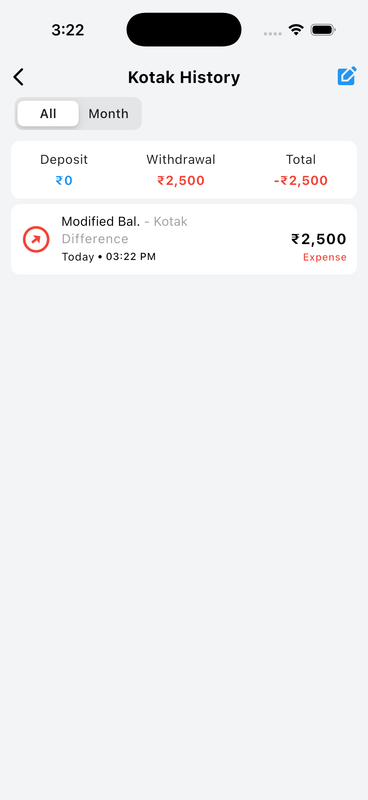
8. Negative History Log
When you initiate a liability, the system smartly logs the negative starting balance in the account's history as an Expense withdrawal.
9. Calculating True Net Worth
Perfect overview! The Tools section now precisely calculates your true financial state by offsetting your positive Assets against your negative Liabilities to determine your accurate Total.
10. Update Existing Accounts
Need to correct a mistake later? Select any account and effortlessly update its balance, toggle formatting, or manage visibility preferences securely.
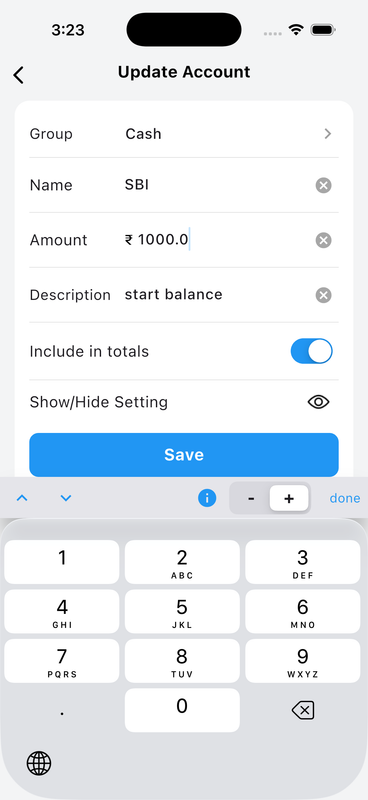
11. Using the Financial Keypad
Our dedicated financial numeric keypad always makes it lightning fast to confidently add or adjust Plus (+) and Minus (-) balances on the fly.
12. Reversing Accounts Automatically
Whenever you update an account from positive to negative (or vice versa), the App effortlessly records the difference as an Expense or Income in the history, maintaining perfect balance logic.
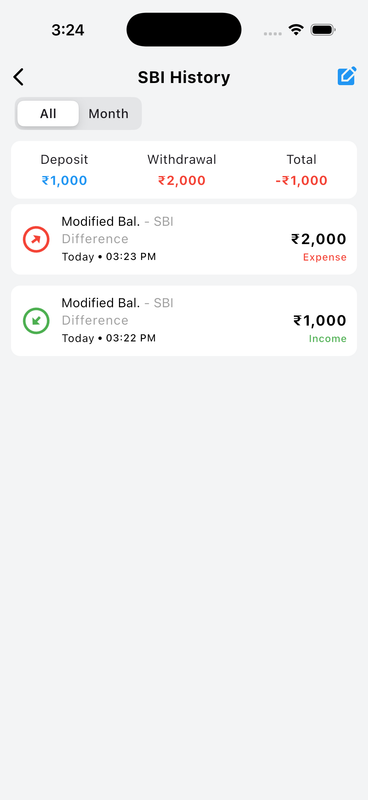
13. Always Balanced, Guaranteed
Your history effectively shows every single manual balance change precisely timestamped and logged, ensuring you have 100% confidence and transparency over your true assets and liabilities.
Step-by-Step Summary
-
1. View Assets & Liabilities Check your total Assets and Liabilities balance from the Tools tab. Blue implies a positive (Asset) balance, and red implies a negative (Liability) balance.
-
2. Start Account Creation Tap the top-right menu and choose Create Account. You can also hide/show accounts, change default settings, and reorder accounts.
-
3. Enter Account Details Select the group, name your account, and type your balance using the financial keypad.
-
4. Define Positive or Negative Use the Plus (+) button for a positive balance (Income/Asset), or the Minus (-) button for a negative balance (Expense/Liability).
-
5. Confirm Initial State When saving, the app asks to confirm whether the unrecorded opening amount should be categorized safely as Income or Expense.
-
6. View Positive History Positive initial balances act as Income and show as a "Modified Bal." inside the account's history log.
-
7. Update Total Assets Check the Tools dashboard again to see your new Positive Account accurately reflecting your total Assets.
-
8. View Negative Setup Add Liability accounts like loans or credit cards by entering a Negative (-) starting amount.
-
9. View Negative History Negative initial balances log in your history automatically as an Expense withdrawal.
-
10. Calculate True Net Worth Your Tools overview accurately subtracts Liabilities from Assets to present your true Net Worth Total.
-
11. Update Existing Accounts Select an existing account at any time to effortlessly correct mistakes, update totals, or toggle visibility.
-
12. Fast Finanical Keypad The integrated keypad makes toggling between Plus (+) and Minus (-) fast and confident.
-
13. Guaranteed Balance Logic Reverse any account from positive to negative at will – Money Manager effortlessly handles matching Income and Expense difference logs for 100% transparent history.
Want to learn more about organizing your daily accounts?
Explore Account Features